Installing outdoor Wi-fi antenna experiences
With the purpose of testing it and, why not, using it when at a nearby lunch place we installed an outdoor Altai A8 antenna in our office roof. Since our focus is in Voip we tested with Hitachi wireless IP 5000 wi-fi phones registering with Pbxnsip IP Pbx. Below are the take aways from the installation experience.
Important points to consider:
Minimizing interference:
Before installing the access point perform a wireless scan to discover all possible interference the antennas will get. Identify what channels are being currently occupied and signal strength of them so you can pick the best channel for your new Access Point. In the United States and Canada there are 11 channels available for use in the 802.11b 2.4GHz WiFi Frequency range, only three of then do not overlap (channels 1, 6 and 11) . This standard is defined by the IEEE.
| Channel | Lower Frequency | Center Frequency | Upper Frequency |
| 1 | 2.401 | 2.412 | 2.423 |
| 2 | 2.404 | 2.417 | 2.428 |
| 3 | 2.411 | 2.422 | 2.433 |
| 4 | 2.416 | 2.427 | 2.438 |
| 5 | 2.421 | 2.432 | 2.443 |
| 6 | 2.426 | 2.437 | 2.448 |
| 7 | 2.431 | 2.442 | 2.453 |
| 8 | 2.436 | 2.447 | 2.458 |
| 9 | 2.441 | 2.452 | 2.463 |
| 10 | 2.451 | 2.457 | 2.468 |
| 11 | 2.451 | 2.462 | 2.473 |
After scanning the site you need choose the channel that has less number of other wi-fi AP working in overlapping channels with the least signal strength to avoid adjacent channel interference.
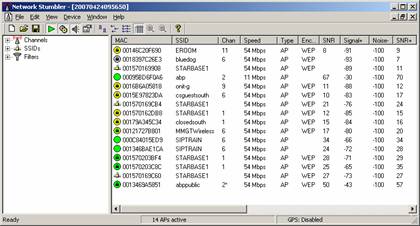
I used a popular tool to scan wireless networks called netstumbler ( http://www.netstumbler.com/ ).
Below is the output of running netstumbler in our location.
We made the decision of using channel 11 because it presented weak interference from only one other AP.
In many cases you would not able to get a clean channel to use but it is particularly important not having other Access Point less than 30 feet from the Altai AP even if it is not in one of the overlapping channels because it would be actively generating traffic most of the time and there is low power harmonic frequencies irradiated that extend over the assigned frequency range. That produces an increased constant noise level and would diminish Altai unique algorithm to differentiate weak signals from noise.
Antenna location and coverage:
Altai is an outdoor antenna that will cover following nominal outdoor distances:
o Rural : 1,000m;
o Sub-urban : 500m;
o Urban : 300m
It is an art predicting actual coverage but the numbers above can give you a good estimate. Many environment elements affect it, being the most important EMI and landscape of the site. Different Structures, their geometry and material block the signals differently. Buildings, trees and even the traffic can create some dead spots.
Most of the times there is no a lot of places to use for mounting the antenna but the higher you can get the better. We had no choice but installing it in our roof.
Physical installation:
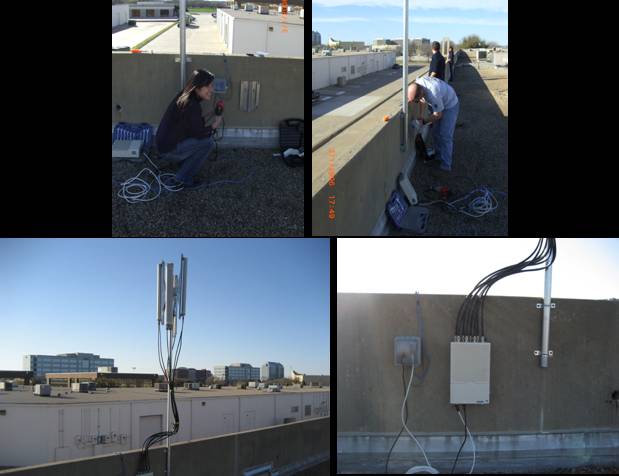
All the above can help find the best location for the antenna or, if possible move around other APs but when mounting the antenna it is important correctly aligning each of the four panels according to the desired coverage area. We decided to aim the panels almost to the horizon (with only 3 degrees inclination) so we could cover as far places a possible. An important take away is that each panel is directional and since none of them aimed down we would had a dead spot of aprox. 20 ft. radius right under the antenna. A 7 foot pole seemed high enough without having to require civil engineering calculus on attaches strength, wind speed, and weight. No strings or major engineering would be required to secure the pole but good attitude and help from ABP staff helped a lot.
Since the antenna apparatus is little heavy, we pre-mounted the pole and installed the brackets first, then we took it down and assembled all the panels and attached them to the pole and mounted the pole back again. We connected the pigtail cables before raising it.
Since the cables have only one correct order, Altai recommends having special care when connecting the cables. Altai A8 device was mounted next to the pole.
Other thing to consider is that you need to bring power and Ethernet next to the antenna. We run a couple cables from our office and connected them to an outdoor water proof plastic box.
Best solution in the market:
There are several offerings in the market today but I find Altai unique technology the best solution for outdoor 802.11a/b/g. Mesh networks offer large coverage (and requires installing a higher number of antennas) but the most important issue that affect real time communications is the latency since in mesh networks the packets have to hop several AP before getting to the backhaul link.
Let the professionals do it:
For more complex scenarios like municipalities or campuses I'd recommend always having professional RF engineers developing the project and dimensioning the number of antennas needed and the backhaul links. Many times it takes applying electromagnetic propagation calculus and using very expensive equipment to run spectrograms in the locations to be covered.
Henry


